*

Offline albertr

  • ***
  • 202
  • 8
    • View Profile
    • my 2001 EVC
Re: Project Lucille -- EVW VR6 Manual Conversion
« Reply #120 on: October 22, 2015, 02:40:26 pm »
Great find, Itsamoto, congratz!

-albertr

*

Offline Itsamoto

  • ****
  • 275
  • 14
    • View Profile
Re: Project Lucille -- EVW VR6 Manual Conversion
« Reply #121 on: October 22, 2015, 08:39:55 pm »
Great find, Itsamoto, congratz!

-albertr

Thanks A  -- yes this was a lucky find. The owner has put a lot of money into dealership repairs -- and outfitting it for wheelchair. So I think when he replaced the ignition switch and couldn't get past the immobilizer  (or stomach the $500 it would probably cost taking it to the dealer) - he was ready to let it go. Maybe I'm a bit naive to believe that both the engine and transmission were replaced without pressing for more proof -- so I will have to get in there and pull some serial numbers and build dates.

I've actually now got 3 EVs in the stable! About  a month back, I happened to find a 2003 for $1k (bad transmission). I missed getting it for $450 by 20 min -- and then the new buyer researched about transmission replacement costs and contacted me a couple days later.  :)

So I will either convert to manual (as I basically have a second set of the components) or renew with Lucille's old transmission.  :)

*

Offline Itsamoto

  • ****
  • 275
  • 14
    • View Profile
Project Lucille -- New van findings
« Reply #122 on: October 24, 2015, 10:44:41 am »
I spent some time last night cleaning the 2002 GLS that I picked up. Found some interesting things in the engine bay that I thought worth sharing. Mainly obvious stuff, but some of these things I'm starting to recognize as  I keep seeing on other 24v EVs. :eek:

2002 VW EV GLS


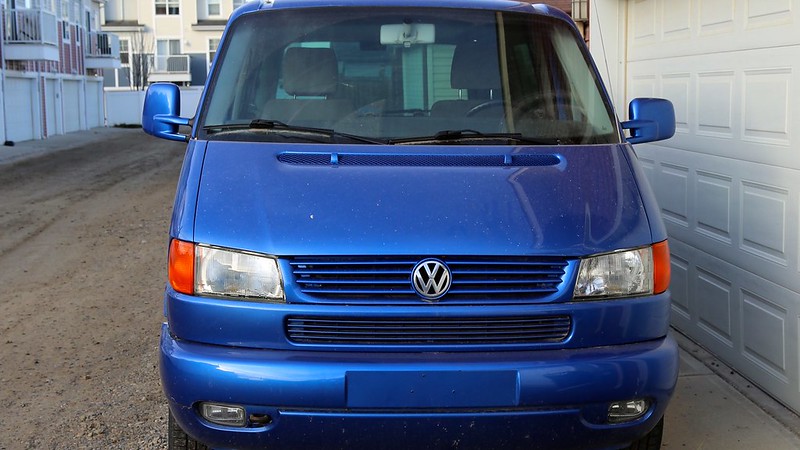
First thing here, and I haven't seen if on my other vans, is this coolant leak from the throttle body. The hose at the top is the coolant return line, the supply line enters from underneath.

BTW - you can also sort of make out the corrosion setting in around the brake booster as well.

Leaking Coolant Hose


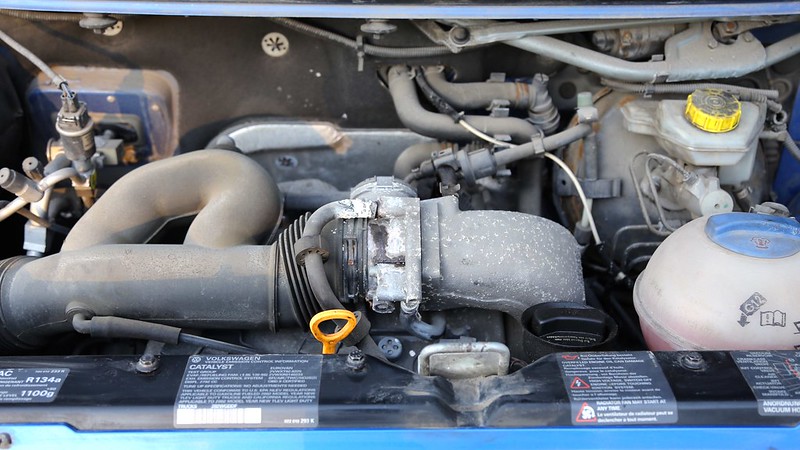
In the regular VR6 world -- the discussion of deleting these lines comes up now and then. Their purpose is to heat/warm the throttle body to prevent it from freezing and getting stuck -- ironically from the crankcase vapours that are fed in upstream. :mad: Since I'm re-routing my crankcase vapours to be downstream of the throttle body - I'm going to delete these lines and thin out some hoses. If you're in a hot climate -- I wouldn't lose any sleep at deleting this. In colder climates, unless you reroute the crankcase vapours I would leave it in. Either way, just make sure you clean the throttle body out once in a while. 

From the garage -- here's a comparison of AXK and BDF throttle bodies (which I first cleaned a lot of oil grime out of).

Throttle Bodies

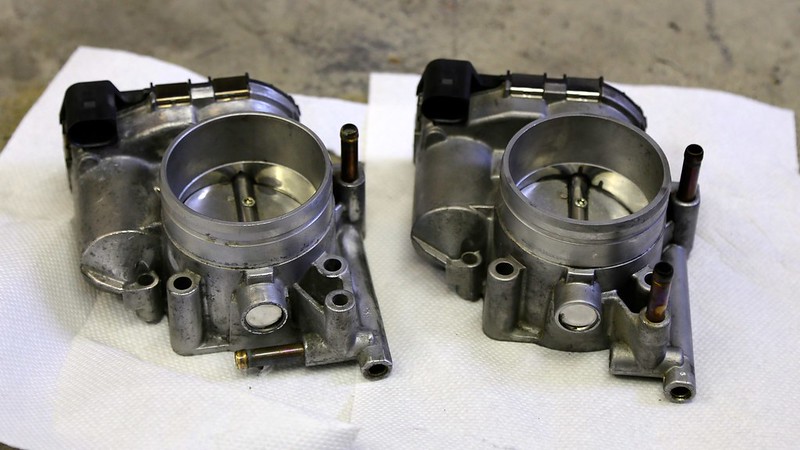
L-R: AXK version, BDF version

These are basically the same thing between the two platforms, the difference is in how the coolant lines are routed. At one end, there is common coolant exit/entry, at at the other end a option (at installation) of 3 different exits/entries. Before examining it, I imagined these "lines" would have been better integrated to the throttle body with less stand off. Honestly, it doesn't even look that effective in the first place! :)

As I'm in "delete" mode, I tried to pull the hose barbs with some vice-grips but they broke off and I ended up drilling them out. The other benefit of this delete, is it eliminates the need for the fragile T-connection that connects the supply line. :thumbup:

Throttle Body Coolant Line
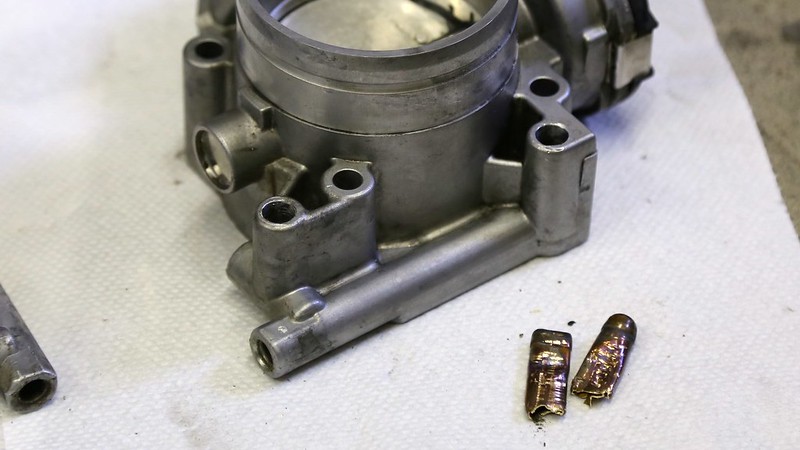
Barbs removed!


Back to the new van....

Here you can see the EVAP line that runs from the N80 valve to the intake looks "wet". Can I safely pressume that some leaking was happening here ? -- the van does throw a P0441 code when I scan it. 

Leaking EVAP line?


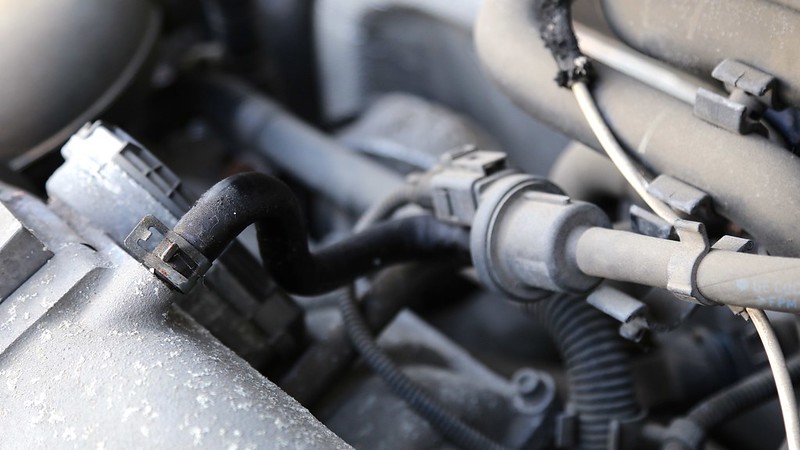
This is where I want to reroute my crankcase vapours -- putting it downstream of the TB. On Lucille, my plan is to basically pull the EVAP hose barb from this part of the manifold-extension and replace it with a tapped fitting. Possibly a T or Y fitting to maintain the EVAP line.

And then, just like Lucille's engine, the oil filler tube is covered in a nice amount of oil. :mad: I take it that the cap also vents -- but this seems a little too common place. Anybody else seeing this on their own van? I take it that crank case gases are getting trapped up in the long tube and then venting through the cap. :mad:

Dirty Oil Filler Tube


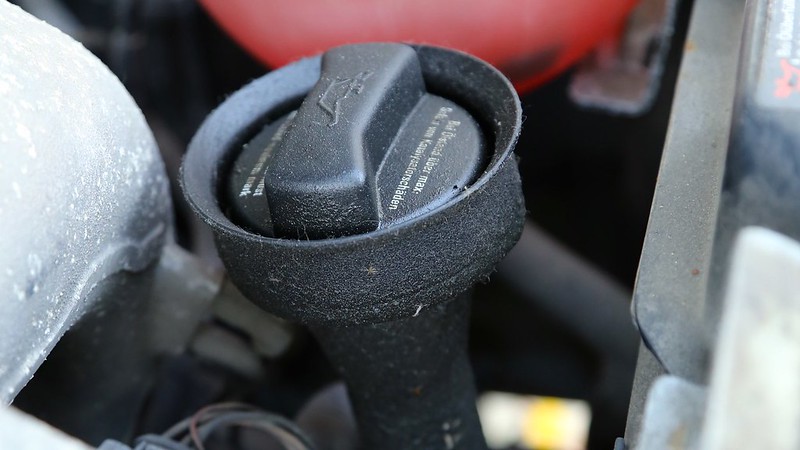
And then, I haven't seen a van that doesn't have this yet....

Dirty Power Steering Fluid Tank


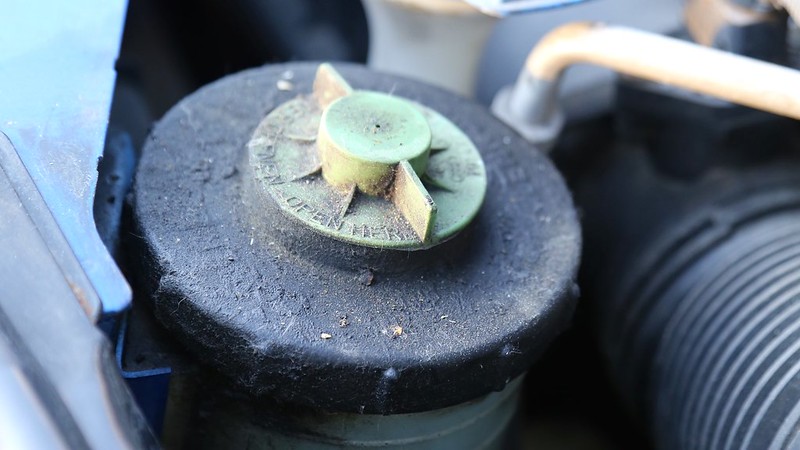
Why is this? Crumby plastic components? Are the vans over pressurizing the line, is there too much fluid in the system? :mad:

From the garage, here's Lucille's leaky PS tank.

Lucille's Dirty Power Steering Fluid Tank


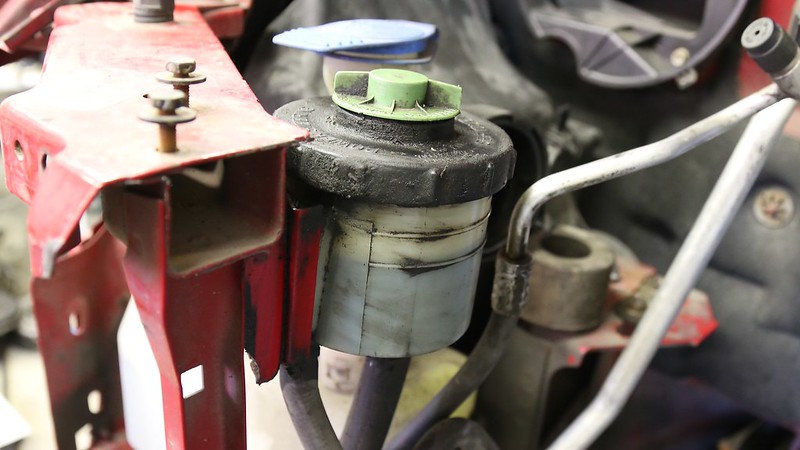
Anyhow -- just some all to common break downs of the EV system. Anybody else seeing similar issues?

*

Offline Itsamoto

  • ****
  • 275
  • 14
    • View Profile
Re: Project Lucille -- EVW VR6 Manual Conversion
« Reply #123 on: October 26, 2015, 10:49:34 am »
Small update here.

Regarding the brake booster line -- seems very common that plastic hose dosen't last on the van. Lucille's was no exception -- I suspected a leak in the vacuum system for a while with the regular symptoms.

EV Brake Booster Line


To remedy this, I plan on replacing the plastic line from the brake booster to the manifold with braided line -- and then rerouting some of the other vacuum items.

To start I'm replacing the hose barb/adapter that's on the  brake booster itself. I ordered a check valve from Summit racing, here: http://www.summitracing.com/parts/SUM-G1465. This will provide -6AN fitting to plumb off of - and at the manifold side I will pull the barb and thread in another adapter (possibly a T fitting).

Brake Booster Line Adapters

L-R: Plastic OEM adapter, Summit G1465 adapter

Swap the rubber grommets between the two -- and then the fit will be nice and snug with the brake booster.

Summit Adapter with Grommet swap


And... here it is installed to the brake booster. Once the engine is back in, I will fit the braided line to length.

Summit Adapter in EV Brake Booster


It's a bit "bling" -- but I think its ok here because its actually replacing a prone-to-fail plastic item.  There is probably a thousand other ways to do this (and many of them cheaper too) -- but this nicely permits both -AN fitting and check valve combined into one item. This also highlights one the benefits of the EV's engine manifold (vs the plastic BDF manifold) -- as it's aluminum makes it a bit more friendly to adapting the line fittings from barbs to something else.

Re: Project Lucille -- EVW VR6 Manual Conversion
« Reply #124 on: October 27, 2015, 08:42:35 am »
Thanks for the updates.  I really like the brake booster mod.  As I am still more familiar with Vanagons, the one thing that stands out in your post is that VW used plastic tanks for a long time (including the hot coolant tank) when a metal tank would have worked much better.  Rocky Mountain Westy now makes a nice metal (aluminum) coolant expansion tank that some of the other major vendors are now selling.  I hope this kind of upgrade is available in the future for us EV owners.
Bill
1993 Syncro Weekender (5 speed Manual)

*

Offline Itsamoto

  • ****
  • 275
  • 14
    • View Profile
Re: Project Lucille -- EVW VR6 Manual Conversion
« Reply #125 on: October 28, 2015, 12:52:58 pm »
Thanks for the updates.  I really like the brake booster mod.  As I am still more familiar with Vanagons, the one thing that stands out in your post is that VW used plastic tanks for a long time (including the hot coolant tank) when a metal tank would have worked much better.  Rocky Mountain Westy now makes a nice metal (aluminum) coolant expansion tank that some of the other major vendors are now selling.  I hope this kind of upgrade is available in the future for us EV owners.

Yes those all aluminum tanks sure look nice!

The coolant ball used on the VR6 was pretty much standard VW for a lot of models -- I am bit surprised a better one wasn't developed by a 3rd party (of maybe there is?).

Too bad for all us EV owners out there right?


*

Offline Itsamoto

  • ****
  • 275
  • 14
    • View Profile
Re: Project Lucille -- EVW VR6 Manual Conversion
« Reply #127 on: October 29, 2015, 10:29:25 pm »
Would these be useful metal for plastic parts? https://www.ecstuning.com/News/VW_Volkswagen_MKIII_Jetta_Golf_B3_Passat_B4_Corrado_Eurovan_T4_VR6_12V_Aluminum_Water_Pipe_Kit_Housing_Eurowise_ECS_Thermostat_ORings_Cover_Adapter_1990_1991_1992_1993_1994_1995_1996_1997_1998_1999_2000/?salesrep=apasternak&utm_source=vortex&utm_medium=forum&utmcontent=apasternak&utm_campaign=newpost

Yes - I think these are a good (albeit expensive) upgrade. I've wanted this for a long time (and have mentioned here too) - but I'm a little short of funds for this "luxury" item. The housing alone in about $200 USD  -- but being in Canada, with the exchange rate and no free shipping -- that balloons into a $300 part.  >:(

Otherwise, I would love to get it. Not only does it get some plastic out of the system -- it also permits some cleaning up of the coolant lines and engine bay. Using this (or any 12v thermostat housing) provides a place to relocate the coolant temperature sensor (blue one at back of engine bay). Combine that with deleting the coolant line to the throttle body -- and some things start to clean up nicely.
« Last Edit: October 29, 2015, 11:16:04 pm by Itsamoto »

*

Offline Itsamoto

  • ****
  • 275
  • 14
    • View Profile
Re: Project Lucille -- EVW VR6 Manual Conversion
« Reply #128 on: November 01, 2015, 12:19:33 am »
Something that has been bothering me for while -- with the access to Lucille's engine bay, I couldn't help but notice how much of mess the power steering system is. This stems from removing the engine and really getting access to all these other sub systems. You get greater access than ever before and you can inspect everything in the bay (for better or for worse).

The problem is multi-headed, but basically the PS system has leaked so much -- everything in the vicinity has some power steering fluid on in. I get that the ps pump is designed to build pressure in the system -- thats what aids/powers the steering rack. But it seems that this pressure also results in a lot of leaks. I honestly thought about dropping the power steering systems in favour of a "de-powered" setup or even just a manual rack -- and then I came to my senses that this is a van and power steering is probably a good thing.


The resevoir itself is major point of leaking -- its so dirty I can't tell if its leaking from the top or the bottom (probably both). Even the mounting bracket it attaches to was covered in PS fluid. :mad:

Power Steering Resevoir


There are are other problems as well -- deeper into the system (closer to steering rack) the pressure line shows a leak.

Pressure Line


Worst of all was the pump itself -- the supply line was leaking steadily and once I removed the pulley, I found a lot of twine wrapped around the pump shaft. Maybe this was something that got sucked up into the engine bay (I also found string around the water pump) - and hopefully not some homespun way of holding hoses out of danger. :mad:

Power Steering Pump


So I pulled the reservoir to start -- its held into the bracket via some clips at the the bottom and it should just slide out the top. For me that didn't work, so I drained it and then pried it out with flathead screwdriver. What a mess this thing is! Not sure what I will replace this with -- perhaps something off another car, maybe a diy container.

Reservoir Pulled


So why does this leak so much? I was asking this before and I think I know some of the answer to this now -- and its rather obvious. The first is that the system is under pressure -- and as JJvincent pointed out - overfilled from the factory. The second thing, obvious to me once I held the cap up to the light...

Power Steering Reservoir Cap


Yep -- and tiny f'n hole in the middle of it. I never noticed it before because the cap was so completely covered in dried up power steering fluid. :laugh:

Beneath the cap -- there is a little breather filter. This works about as good as the crank case ventilation filter -- letting vapour crap escape.

Cap Filter

*

Offline Itsamoto

  • ****
  • 275
  • 14
    • View Profile
Re: Project Lucille -- EVW VR6 Manual Conversion
« Reply #129 on: November 01, 2015, 12:20:01 am »
The twine that wrapped around the pump shaft is a pain. There is actually enough there to cause noticeable resistance when turning the pump by hand. So I removed the PS pump and compared it with the one I have from the GLI (which turns easily)-- just in case I need to use this.

Power Steering Pump Comparison

L-R: AXK pump, BDF pump

For the most part the pumps are probably interchangeable. Their mounts to the ancillary bracket are the same -- the pulley mount is the same. The pressure line outlet (the threaded port shown pointing up) is the same - same thread too so I can use the banjo bolt from Lucille. The only thing that presents a challenge is the supply line inlet -- on the AXK's it angles out towards the passenger side, where as the BDF version faces full on to the drivers side. I may try and pull the hose barb, tap the hole and then fit something like AN fitting that can hold the pressure and reroute the line. Deleting the PS fluid hard cooler-line is also a thought - if it helps with routing.

Specification wise, the pumps are slightly different. The AXK is rated for 106 BAR, and the BDF pump is rated for 100 BAR. So this might be a good thing -- a downgrade to lower line pressure in order to reduce the chance of leaks?

Pump Backs

L-R: AXK pump, BDF pump


The AXK PS pump reminds me of the quality difference that I saw in comparing the original clutch throw out bearing with the available replacements -- where the original component is superior quality with tight tolerances in the casting, serviceable back and machined surfaces. The BDF PS pump (a Delphi?) is cast and unless there is something under that sticker, it cannot be opened up. Perhaps a nothing point  (moot ;)) - because really, how many reasons can you find that require the pump to be opened and inspected? Still the ability to do that makes me think the original pump is better quality (for the reasons mentioned above). Where as the cast pump, I notice a small amount of fluid is visible through that back surface. Perhaps this is a left over from me storing it in a pile of oily parts, or perhaps a slow leak (and its not even under pressure yet!).

And finally, here is the pump pulled apart. 

AXK PS Pump Disassembled


You can see how much twine I was able to pull off the shaft -- end to end thats at least a couple of feet. Unfortunately, after getting it all out , the pump was still somewhat difficult to turn and I suspect the bearing is shot and will need to be replaced.

*

Offline Itsamoto

  • ****
  • 275
  • 14
    • View Profile
Re: Project Lucille -- EVW VR6 Manual Conversion
« Reply #130 on: November 26, 2015, 12:27:12 pm »
So I mentioned before that I wanted to run an oil catch can off the valve cover. I think it makes a lot of sense after seeing all the oil vapour sludge that gets into the manifold and throttle body -- not to mention what it did to Lucille's engine bay -- coating and destroying the van's original PCV hose and also draining oil upstream towards the MAF sensor.

Here's a flashback:

[INDENT]Damaged PCV Hose


Oil Soaked MAF Sensor
[/INDENT]

Notice that the MAF is installed upside down? It's a nice little way to drain oil into all the hard to reach places of the engine bay. :mad:


So a catch can seems like a good idea not only to keep the intake components clean, after some sage advice from Eric D in the 24v 2.8L VR6 technical forum -- its also a good way to keep that oil sludge from accumulating inside the engine.

There are multiple ways to do this by running a hose in place of the PCV to the the catch can -- some involve just clamping a new hose to the barb, or you can remove the hose barb to fit an adapter. I have even seen a thread or two whereby the valve cover is cut open and modified for greater ventilation (and oil separation?). Lots of techniques -- there is no shortage of imagination. I went with the "after market" adapter route as I'd like to run some nice -AN fittings with some upgrade hoses eventually. I toyed with the idea of pulling the barb and threading the hole -- but the cost for the tap alone was going to much higher than the $15 adapter and the fitting probably wouldn't have worked as nice either.

So, here's what I ordered:

CTS -10AN Valve Cover Breather Adapter

Item page: http://www.ctsturbo.com/cart/products/CTS_10AN_Valve_Cover_Breather_Adapter_For_06A_1_8T-4839-581.html

CTS Turbo lists these as for 1.8t engines, but I called them and asked that they measure the diameter of the input side which was a clean 20mm. Which makes this the same as the one offered by Integrated Engineering (specified for 24v VR6) but for $5 less.

The interesting thing is that the IE page describes the install as just a press-in fit. As I have 2 extra BDF valve covers just lying around, I decided to measure things first. I pulled the hose barb with some lock pliers and true to form the inside diameter was pretty much 20.0mm. A quick test on the BDF valve cover confirmed it was going to be a push-to-fit adapter. However, when I went to install on AXK valve cover -- its actually like 0.1mm larger in diameter and so the fit was looser.

Valve Cover Adapter and AXK Hose Barb


Here's why I think the adapter would actually work better than threading in another adapter... If you look at this picture, it shows (from the inside) the outlet hole where the hose barb is pressed in.


And then with the adapter sitting in place (sorry lame photo) - you can see that the adapter's depth is also a perfect match for the valve cover. Some the options I was pursuing with tapping and threading an adapter in -- would have further protruded into the valve cover by probably .125-.75" -- restricting the vapour flow.


And installed to the valve cover, I used some cold weld to create the seal and make up the 0.1mm difference.

Breather Adapter Installed

*

Offline albertr

  • ***
  • 202
  • 8
    • View Profile
    • my 2001 EVC
Re: Project Lucille -- EVW VR6 Manual Conversion
« Reply #131 on: December 20, 2015, 07:27:23 am »
Here's a picture of cracked PCV hose off my 2001 EVC:


No way I'm paying VW $95 for this plastic hose! Putting back the old hose with some bandage applied:


I was out of black caulk... ;D


-albertr


*

Offline albertr

  • ***
  • 202
  • 8
    • View Profile
    • my 2001 EVC
Re: Project Lucille -- EVW VR6 Manual Conversion
« Reply #132 on: January 04, 2016, 01:57:58 pm »
Great pictures! That metal screen behind cam housing - I just removed it and run my AXK without it. I'm not really sure why they ever try to filter the motor oil supplied to cam adjusters...

-albertr

Just noticed that I've clocked 13K miles after chains replacement on my AXK. So it looks like it's running fine so far without this nasty brittle little screen.

-albertr

*

Offline albertr

  • ***
  • 202
  • 8
    • View Profile
    • my 2001 EVC
Re: Project Lucille -- EVW VR6 Manual Conversion
« Reply #133 on: January 04, 2016, 03:26:20 pm »
Well a small milestone today... I pulled out most of the automatic transmission wiring and the gear selector. I was looking at doing it earlier, but always seem to find another thing that was bit more important at the moment. Funny how something as simple as a hole in the floor can feel like progress. :)

01P Wiring Harness and TCU


After struggling with it for a while -- I pulled the transmission computer module first, which left lots of room to feed the harness through. It also helps to bend the wiring panel holder out of the way too.  ;D

Transmission Computer Cave


Then everything can simply be disconnected - no need yet to rip anything out from the back of the wiring panel.

What I haven't removed -- is this little bit of wiring from the automatic selector - it routes back the wiring panel under the carpet.  The open connector is probably for for the shift lock solenoid -- but there is also a little "limit" switch here as well -- not sure what this is. Any ideas?

Transmission selector wiring


Itsamoto, since you went thru the process of removing A/T on your EV, I want to check with you on A/T wiring... I'm thinking on modding my 2001 EVC to do automatic door locking/unlocking as a winter weekend project. I'm planning to use some programmable micro-controller to supply +12DVC via relays to actuators ( good write-up on how actuators work is available here: http://www.gowesty.com/tech-article-details.php?id=46 ). Just need to figure out the logic when to engage locking-unlocking.

I think either of the following would work for this purpose:

- read whether transmission in the park mode
- read whether transmission in the reverse gear
- receive notification when A/T transmission switches gears
- read the current vehicle speed from the ECU (if it's ether possible).
- read the current gear selection from ECU or TCM

I think the first two options might be easiest, just need to figure out its schematics. Any thoughts?

-albertr

*

Offline Itsamoto

  • ****
  • 275
  • 14
    • View Profile
Re: Project Lucille -- EVW VR6 Manual Conversion
« Reply #134 on: January 29, 2016, 09:48:52 pm »
Itsamoto, since you went thru the process of removing A/T on your EV, I want to check with you on A/T wiring... I'm thinking on modding my 2001 EVC to do automatic door locking/unlocking as a winter weekend project. I'm planning to use some programmable micro-controller to supply +12DVC via relays to actuators ( good write-up on how actuators work is available here: http://www.gowesty.com/tech-article-details.php?id=46 ). Just need to figure out the logic when to engage locking-unlocking.

I think either of the following would work for this purpose:

- read whether transmission in the park mode
- read whether transmission in the reverse gear
- receive notification when A/T transmission switches gears
- read the current vehicle speed from the ECU (if it's ether possible).
- read the current gear selection from ECU or TCM

I think the first two options might be easiest, just need to figure out its schematics. Any thoughts?

-albertr

Hi Albert,

Sorry for the late reply. I really don't think I can be of much help with this -- but I'm sure it could be figured out with the schematic. I hadn't read that GoWesty article before -- and now (thanks to you) I know that I should make sure the passenger side door lock actuator is set to slave. And I know this from experience after getting myself locked out Lucille (while she was running) at -30C for 1 hour.  >:(

I assume you want the doors to lock when the van begins to move, but not necessarily unlock just because you put into park? There is some logic there that needs to be worked out -- otherwise you could just tie into Park-Nuetral-Position relay (J226) that is located in the lower part of the centre dash console. Tied in, you could have it so once the van is shifted out of park (and the PNP relay opens) -- that the doors could lock automatically. But in doing so without another logic -- would this mean everytime you put the van into park (with the ignition on) the van would unlock? Hmmmm... I don't know.  :D

That being said -- if there is one thing I would really like for somebody to figure out is to make the rear hatch release on command. Maybe its not so useful, but all my other VW's of this vintage all have a separate hatch/trunk release which I find very useful (or I'm conditioned to expect) -- with 3 button key fobs vs 2 button for the EV.  :)